I recently needed to create custom 'arrays' within Magento's admin panel to support drop-down lists rather than just text fields. This can be a much more convenient means of configuring more complicated backend settings.
When I say 'arrays', I'm talking about the type of interface element you can see if you go to System -> Configuration -> General -> Design -> Themes in the Magento admin interface and click one of the 'Add Exception' buttons. Each time you click the 'Add Exception' button, you'll be presented with a pair of text fields. You can add news rows and delete existing ones, and they'll still be there when you save the config settings.
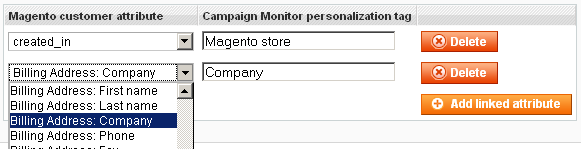
The extension I was working on (Campaign Monitor integration) needed an interface which would let you specify a Magento customer attribute and a corresponding Campaign Monitor subscriber attribute, so it could synchronise data between the two systems. Text fields would have worked, but drop-down list boxes pre-populated with all the available attributes are a lot easier to use. Here's a screenshot from the Campaign Monitor extension (this uses one drop-down and one normal text field, as opposed to two drop-downs as used in the example to follow):
So, let's consider an example. Create a new module located at app/code/local/examplemodule, and open the system.xml file for editing. You need to add a section that looks something like this:
<config>
 <sections>
 <general>
 <groups>
 <examplemodule translate="label">
 <label>Example Module Settings</label>
 <frontend_type>text</frontend_type>
 <sort_order>0</sort_order>
 <show_in_default>1</show_in_default>
 <show_in_website>1</show_in_website>
 <show_in_store>1</show_in_store>
 <fields>
 <example_array_field translate="comment">
 <label>Example array field</label>
 <frontend_model>examplemodule_block_customarray</frontend_model>
 <backend_model>adminhtml/system_config_backend_serialized_array</backend_model>
 <sort_order>25</sort_order>
 <show_in_default>1</show_in_default>
 <show_in_website>1</show_in_website>
 <show_in_store>1</show_in_store>
 <comment></comment>
 </example_array_field>
 </fields>
 </examplemodule>
 </groups>
 </general>
 </sections>
</config>
This defines a configuration field for the module, which is set to show up in the 'General' section of the Magento configuration page. The important part is the <frontend_model> element. That needs to be set to point to a custom block inside the module. The contents ('examplemodule_block_customarray' here) will make Magento look for app/code/local/examplemodule/Block/Customarray.php
Moving along to Customarray.php, which needs to contain:
<?php
class Examplemodule_Block_Customarray extends Mage_Adminhtml_Block_System_Config_Form_Field_Array_Abstract
{
 protected $magentoAttributes;

 public function __construct()
 {
 $this->addColumn('animal', array(
 'label' => Mage::helper('adminhtml')->__('Animal'),
 'size' => 28,
 ));
 $this->addColumn('colour', array(
 'label' => Mage::helper('adminhtml')->__('Colour'),
 'size' => 28
 ));
 $this->_addAfter = false;
 $this->_addButtonLabel = Mage::helper('adminhtml')->__('Add new coloured animal');

 parent::__construct();
 $this->setTemplate('example/array_dropdown.phtml');
 }

 protected function _renderCellTemplate($columnName)
 {
 if (empty($this->_columns[$columnName])) {
 throw new Exception('Wrong column name specified.');
 }
 $column = $this->_columns[$columnName];
 $inputName = $this->getElement()->getName() . '[#][' . $columnName . ']';

 $rendered = '<select name="'.$inputName.'">';
 if ($columnName == 'animal') {
 $rendered .= '<option value="cat">Cat</option>';
 $rendered .= '<option value="dog">Dog</option>';
 $rendered .= '<option value="monkey">Monkey</option>';
 $rendered .= '<option value="rabbit">Rabbit</option>';
 } else {
 $rendered .= '<option value="red">Red</option>';
 $rendered .= '<option value="blue">Blue</option>';
 $rendered .= '<option value="yellow">Yellow</option>';
 $rendered .= '<option value="green">Green</option>';
 }
 $rendered .= '</select>';

 return $rendered;
 }
}
As you can see, this overrides the impressively-named Mage_Adminhtml_Block_System_Config_Form_Field_Array_Abstract class. This is responsible for rendering the individual rows in our config array. (Actually, it renders part of a template for an array row, but we'll get to that later.) We only need to override two functions. The constructor adds two columns to our array, giving each one a name and a size (the size is only really useful for text fields). Importantly, it also sets the path to the template the block will use to render itself.
The _renderCellTemplate() function is what actually gets called to create the HTML that forms the array rows. It is called with a column name as an argument, which we use to determine which options we output. In the example above, the 'animal' column will generate a drop-down list of animals, while 'colour' will generate a list of colours (I'll leave it to your imagination as to exactly what this is configuring.)
The template path we gave above gets appended to app/design/adminhtml/default/default/template to produce a full path of app/design/adminhtml/default/default/template/example/array_dropdown.phtml. This file is based on app/design/adminhtml/default/default/template/system/config/form/field/array.phtml, which is quite large and so won't be included here. The important part of the file is the JavaScript at the bottom. This uses the simple template feature of Prototype to create a template that gets filled out whenever a new array row is created. Part of the template is hard-coded, and the rest of it is generated by the _renderCellTemplate() function in Customarray.php. Once the template has been created, it gets used to show any previously saved rows and to generate new ones when you click the 'Add' button.
As it stands, the stock array.phtml would almost work - it will happily print out our drop-down list HTML. What it won't do, however, is set the selected attribute so we know which options we saved previously.
First off, on line 70, change:
+'<td>'+'<td class="#-<?php echo $columnName; ?>">'This will give each of our cells containing a drop-down a class we can use to identify them later.
Next, add the following code at line 110 (some existing code included so you can see where the new code goes):
 ...

 // insert after specified row
 else {
 new Insertion.After(
 $(insertAfterId),
 this.template.evaluate(templateData)
 );
 }

// NEW CODE

 // set the selected drop-down list item
 <?php foreach ($this->_columns as $columnName => $column): ?>
 var options = $$('td.' + templateData._id + '-' + '' + ' option')
 for (var index = 0; index < options.length; ++index) {
 var option = options[index]
 if (option.getAttribute('value') == templateData.<?php echo $columnName?>) {
 option.selected = true
 }
 }
 <?php endforeach; ?>

// END NEW CODE


<?php if ($this->_addAfter): ?>
 Event.observe('addAfterBtn' + templateData._id, 'click', this.add.bind(this, '', templateData._id));
<?php endif; ?>

 ...
This creates some JavaScript for each column in our array that finds all the option elements for each select element, checks their values and adds the selected attribute to the one that matches our saved value.
And that's all there is to it; you should now have a new configuration array consisting of drop-down lists. For a working example, install our Campaign Monitor extension and take a look at the files installed. The method used for this type of interface element takes a bit of getting used to, but is quite powerful - this example can be adapted to use pretty much any mix of HTML form elements.